HOOTIO VIDEOBOT · PRACTICAL GUIDE
Hootio VideoBot User Manual
A guide to the HootHoot.MAUI desktop application
This manual guides video editors through media import, preprocessing, proxy creation, multicamera chapter review, Smart Clean, exposure adjustment, speech-based scene extraction, Story Edits, and timeline export. If you are new to the application, follow Chapter 2. If you already have a preprocessed project, you can start at Chapter 7.
The desktop application is branded Hootio VideoBot, while the project and executable retain the HootHoot.MAUI name. Its main outputs are timelines that you can continue editing. Final films normally need to be reviewed, refined, and rendered in Premiere Pro or DaVinci Resolve. The presence of FCPX in a filename does not mean that full Final Cut Pro compatibility has been verified.
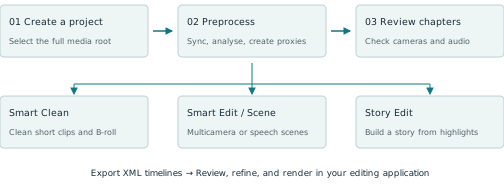
Online manual: Hootio VideoBot User Manual.
Manual date: 25 September 2026. Button names follow the English interface for easy reference.
Demo media: D:\VIDEO\2025\20250315. The screenshots captured for this manual show a new project, media selection, the start of preprocessing, and settings. The screenshot showing completed preprocessing comes from an existing project using the same path; it does not establish that the new project has finished.
Version notes: This manual was checked against the source code in the current workspace and the installed application. The installed version uses a numeric slider for Number of Bots; the newer workspace version uses Low / Medium / High / Extreme. Some proxy settings also differ, as explained in the relevant chapters. This edition provides static instructional images; the application's original historical animations are not included.
1 Features and Where to Find Them
| Feature | Entry point | Purpose and result |
|---|---|---|
| Create a project | Create New Edit on the home screen | Select a media root folder and create a new editing project |
| Open a project | Recent Edits or Existing Edits | Continue a previous project and review its existing analysis and chapters |
| Preprocessing | PreProcess | Scan media, synchronise audio, analyse clips, and optionally analyse exposure and create proxies |
| Proxy creation | Create Proxies and Settings | Create lightweight editing files for high-bitrate media |
| Update the media location | Update Video Folder | Relocate an existing project's media folder; check the recognised media after reopening |
| Smart Clean | Smart Clean | Generate a cleaned timeline using motion stability, duration, and person-detection rules |
| Exposure export | Smart Expo | Include exposure adjustments and configured LUTs in supported exported projects |
| Export an original chapter | Double-click a chapter → Export | Export the chapter's synchronised multitrack timeline |
| Smart multicamera editing | Double-click a chapter → Smart Edit | Review cameras and the ranges to keep or exclude, then generate an edit |
| Speech-based scenes | Double-click a chapter → Smart Scene | Prepare a transcript, select speech passages, and extract scenes |
| Story editing | Create Story Edit | Select a story goal and duration, then submit a Story Edit task |
| Previous Story Edits | My Story Edits | Review task status and failure reasons, and download completed Story Edit results |
| Global settings | Settings gear icon | Set output resolution, video standard, proxies, chapter gap, LUTs, and interface language |
| Tutorials | Tutorial | Open the built-in preprocessing, cleaning, exposure, or chapter tutorials |
How the names differ. An Edit is a media project. A Chapter is a section grouped by its timing. Smart Edit creates a multicamera edit within a chapter. A Story Edit arranges highlights around a story structure. Proxy files make editing smoother; XML files exchange timelines. Neither is a final delivery film.
Controls that are not currently available. Import FCPXML on the main screen and Rough Edit in the preprocessing controls are hidden in the current source code. Do not rely on older videos to locate these controls. The Instant Reel name used in older tutorials also does not describe the full behaviour of today's Create Story Edit.
2 Your First Complete Workflow
Choose the media root folder for a complete event or wedding, and make sure that all camera and audio recordings are inside it. The following example uses D:\VIDEO\2025\20250315.
1. Start Hootio VideoBot. The application may restore your login if you have a valid session. Otherwise, follow the sign-in screen to authenticate in your system browser, then return to the application.
2. Click Create New Edit on the home screen. When the empty editing window opens, maximise it and confirm that Video Folder is empty and the file count is 0 / 0.
3. Click Choose Video Folder. Enter D:\VIDEO\2025\20250315 in the system folder picker, then click Select Folder.
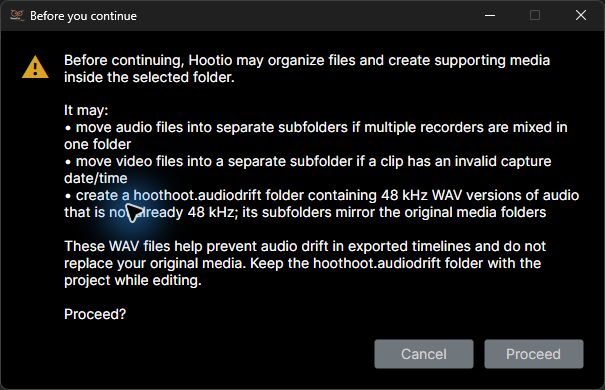
4. Read the Before you continue notice to understand file organisation and auxiliary audio processing, then click Proceed when ready. The media list and file count appear, and PreProcess becomes available.
5. Open the settings gear and check the output resolution, PAL / NTSC, chapter gap, and proxy options. Select Use GPU, Auto Exposure, and Create Proxies as needed.
6. Click PreProcess, then click Yes in the confirmation dialog. Wait for the status messages to update. A completed scan count does not mean that all analysis has finished.
7. When the status reads Done. and All preprocessing stages are complete., review Main Chapters. Double-click a chapter and choose Export, Smart Edit, or Smart Scene.
8. Import the exported timeline into your editing application. Check picture synchronisation, sound, media links, colour, and edit points, then refine the edit and render the final film.
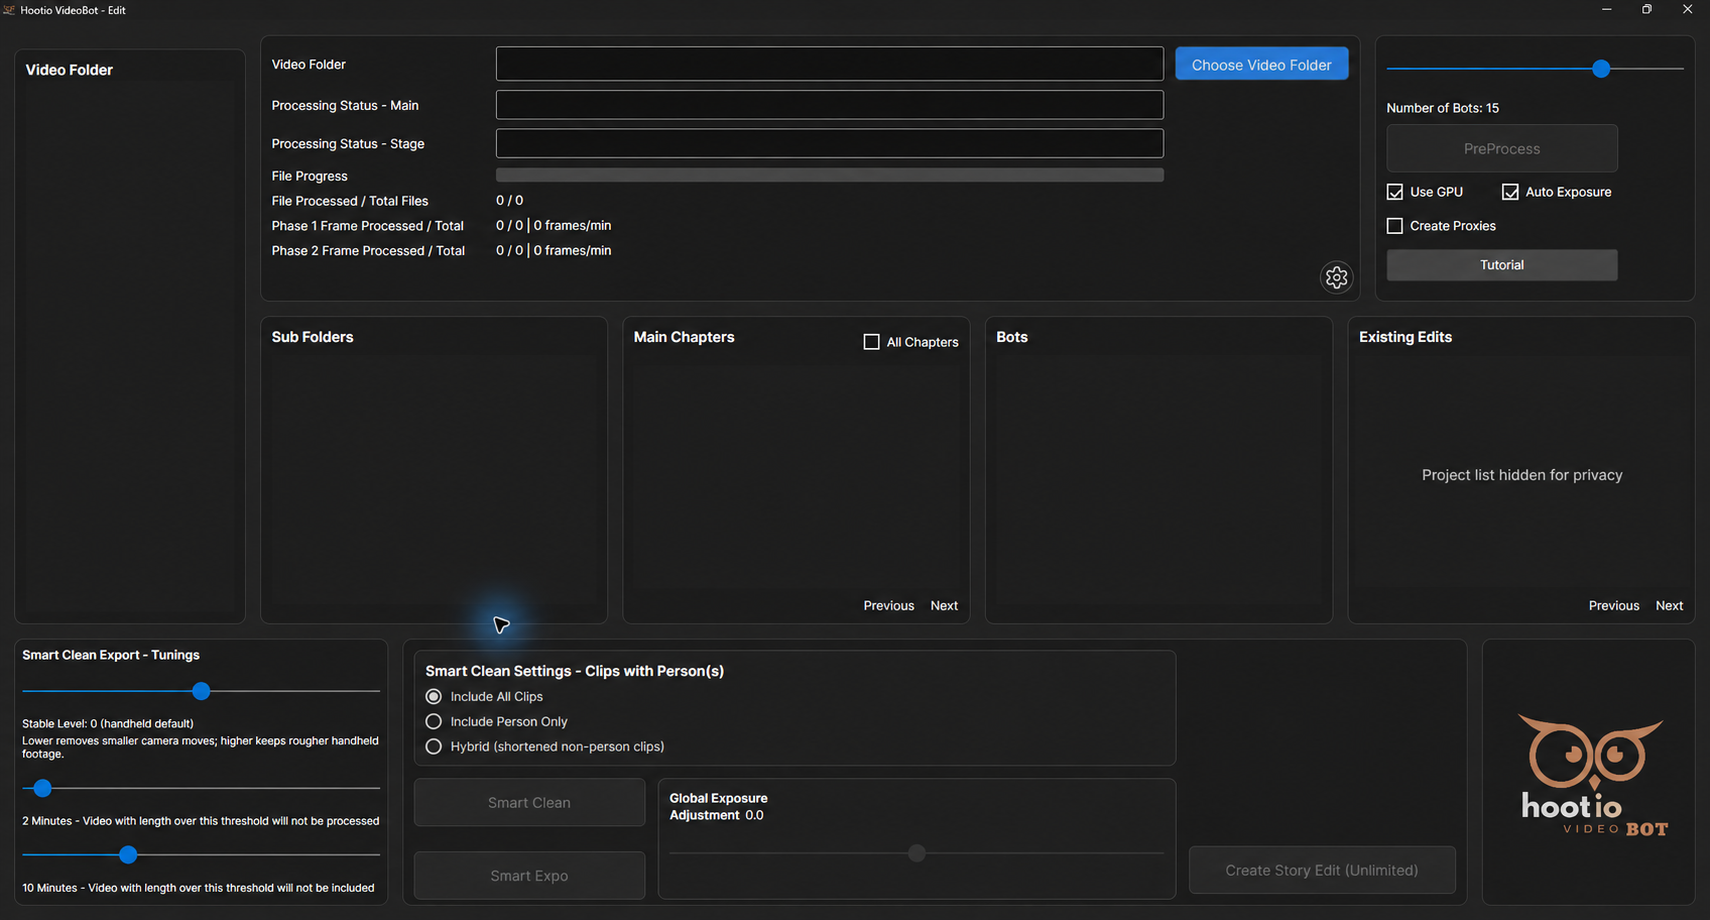
Creating a project and continuing an existing edit are separate actions. To create a new demo project, start with Create New Edit. Double-clicking an existing 20250315 entry restores that older project.
3 Preparing Media and Understanding Import Changes
Which folder level to select
Select the root folder containing all camera and audio subfolders, rather than a folder for just one camera. In this demonstration, the root contains subfolders such as 1, 100MEDIA, 100_PANA, 108_PANA, and Audio. Your subfolder names may differ.
Keep each camera and audio recorder in its own subfolder where possible, so that their sources are easy to recognise. Before processing, make sure that the source drive is connected, the files can be read, and the media will not be moved or renamed during processing. Proxies and auxiliary media require additional disk space.
What the import confirmation means
The application explicitly warns that it may organise media during import. Audio from multiple recorders in one folder may be moved into separate subfolders. Videos with invalid recording dates or times may be moved into a separate subfolder. Audio that is not sampled at 48 kHz may have auxiliary 48 kHz WAV files created for it.
These auxiliary audio files are stored in hoothoot.audiodrift, with a subfolder structure corresponding to the original media. They help reduce audio drift in exported timelines and do not replace the original recordings. Keep this auxiliary folder throughout editing. If you have only one copy of the original media, create a recoverable backup before proceeding with file organisation.
What to check after import
Check that Video Folder at the top matches the folder you selected. Review the cameras and media in the Video Folder list on the left, and confirm that the total in File Processed / Total Files is not zero. It is normal to have no chapters at this point; chapters require the subsequent synchronisation and analysis stages.
4 Signing In and Managing Projects
Sign in and sign out
Click Sign in or create account, complete verification on the Microsoft Entra page in your browser, and return to VideoBot. To create an account, use Create account → Create account with Microsoft Entra. For help signing in, use Sign-in help → Continue to Microsoft Entra. Click Cancel sign in to stop the current attempt. Accounts that use an email verification code should request a new code; other accounts should follow the recovery process provided by their original identity provider.
Closing the application normally preserves your remembered login. Log Out actively revokes the current session. If your login expires, your session becomes invalid, or a network problem interrupts access, restore your login before opening the project again.
Your account or plan may affect the number of Story Edits available, the remaining allowance, or the button label. Follow the information shown for your account and the service's responses. This manual does not specify fixed prices or allowances.
Reopen an existing project
1. Find the project under Recent Edits on the home screen. The list displays its name and Last Mod time.
2. Double-click the entry to open it. Use Previous / Next if the list has more than one page.
3. You can also select previous projects from Existing Edits in the editing window. The same folder may have several projects with identical names; use the modification times to distinguish them.
4. After opening, check the media path, file list, and preprocessing status. A matching project name does not mean that the local media is still in its original location.
After moving your media
When an existing project shows Update Video Folder, click it to select the new media root folder. Preserving camera subfolders and filenames helps the application recognise the media. The application checks the selected videos against the original project's baseline. If the difference exceeds 30%, it rejects the update and asks you to create a new project. After an accepted update, check that all media has been found. You cannot update the folder while preprocessing is running.
Saving a project. Project records are created or updated during processing; there is no separate Save Project button. A project deletion control has not been verified in the current application. Do not use Delete or Ctrl+S as project-management steps for this application. Temporary adjustments in a chapter window are also not equivalent to a recoverable draft; generate and save the results you need before closing it.
5 Preprocessing Options and How to Run Them
Settings to check before running
| Option | How to choose | Effect |
|---|---|---|
| Number of Bots | Choose Low / Medium / High / Extreme in the newer version; the installed version shown in the screenshots uses a numeric slider | Controls parallel processing resources without changing the analysis quality standard |
| Use GPU | Select it when supported acceleration hardware is available; if you encounter stability problems, clear it and retry | Allows supported hardware processing paths; not every stage will fully utilise the GPU |
| Auto Exposure | Select it before preprocessing if you will need exposure processing later | Prepares exposure analysis for Smart Expo and related workflows |
| Create Proxies | Select it when you need lightweight editing files, and check the proxy settings first | Adds proxy generation and uses additional disk space |
The newer workspace version uses fixed CPU parallelism levels: Low allocates 25% of the available logical cores, Medium 50%, High 75%, and Extreme 100%. These settings configure parallel processing resources; they do not guarantee that Task Manager will continuously show that CPU percentage. Medium is the default in the newer version. On a computer that is busy with other work, start with Low or Medium.
Start processing
1. Confirm that media has been imported, the folder at the top is correct, and PreProcess is available.
2. Set the resource level and checkboxes, then click PreProcess.
3. Click Yes in Confirm Pre-processing.
4. Monitor Processing Status - Main and Processing Status - Stage. Some buttons may be disabled while processing is running.
5. Keep the media drive connected. Wait for completion before cleaning clips, exporting exposure adjustments, or exporting multicamera edits.
6 How to Tell When Preprocessing Is Complete
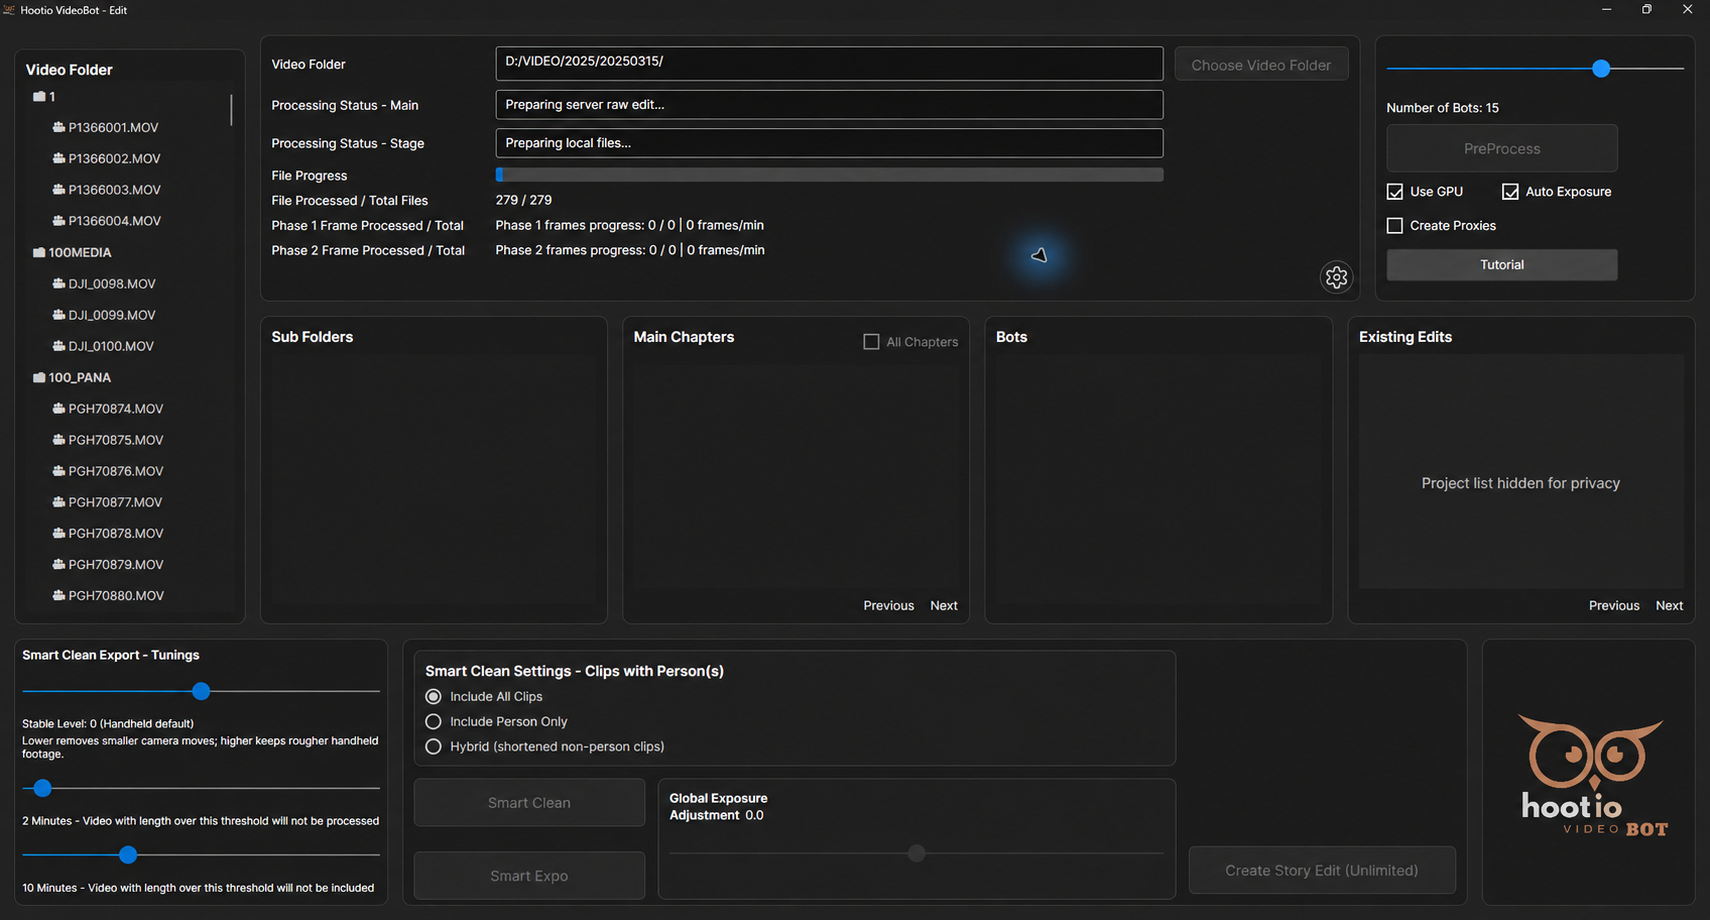
Preprocessing has several progress indicators. Scanning, audio synchronisation, person or image analysis, motion analysis, and proxy generation each take time. A progress bar reaching the end and switching to another stage does not mean that the entire task is starting again.
| Interface item | What it means | What to check |
|---|---|---|
| Processing Status - Main | The current main task | Look for scanning, synchronisation, processing, or completion messages |
| Processing Status - Stage | The current substage, file, or estimated time | If a long file takes more time, first check whether the information is still updating |
| File Processed / Total Files | The file processing count | Distinguish the scan count from the Phase 1 / Phase 2 processing counts |
| Phase 1 Frame Processed / Total | Frames processed and throughput for the first phase | Check whether the first phase still has work to do |
| Phase 2 Frame Processed / Total | Frames processed and throughput for the second phase | Check whether the second phase still has work to do |
| Bots | Worker task status | Read it alongside the status fields above to determine whether processing is still running |
The reliable completion signal is Done. in the main status and All preprocessing stages are complete. in the stage status. Do not rely solely on the blue File Progress bar.
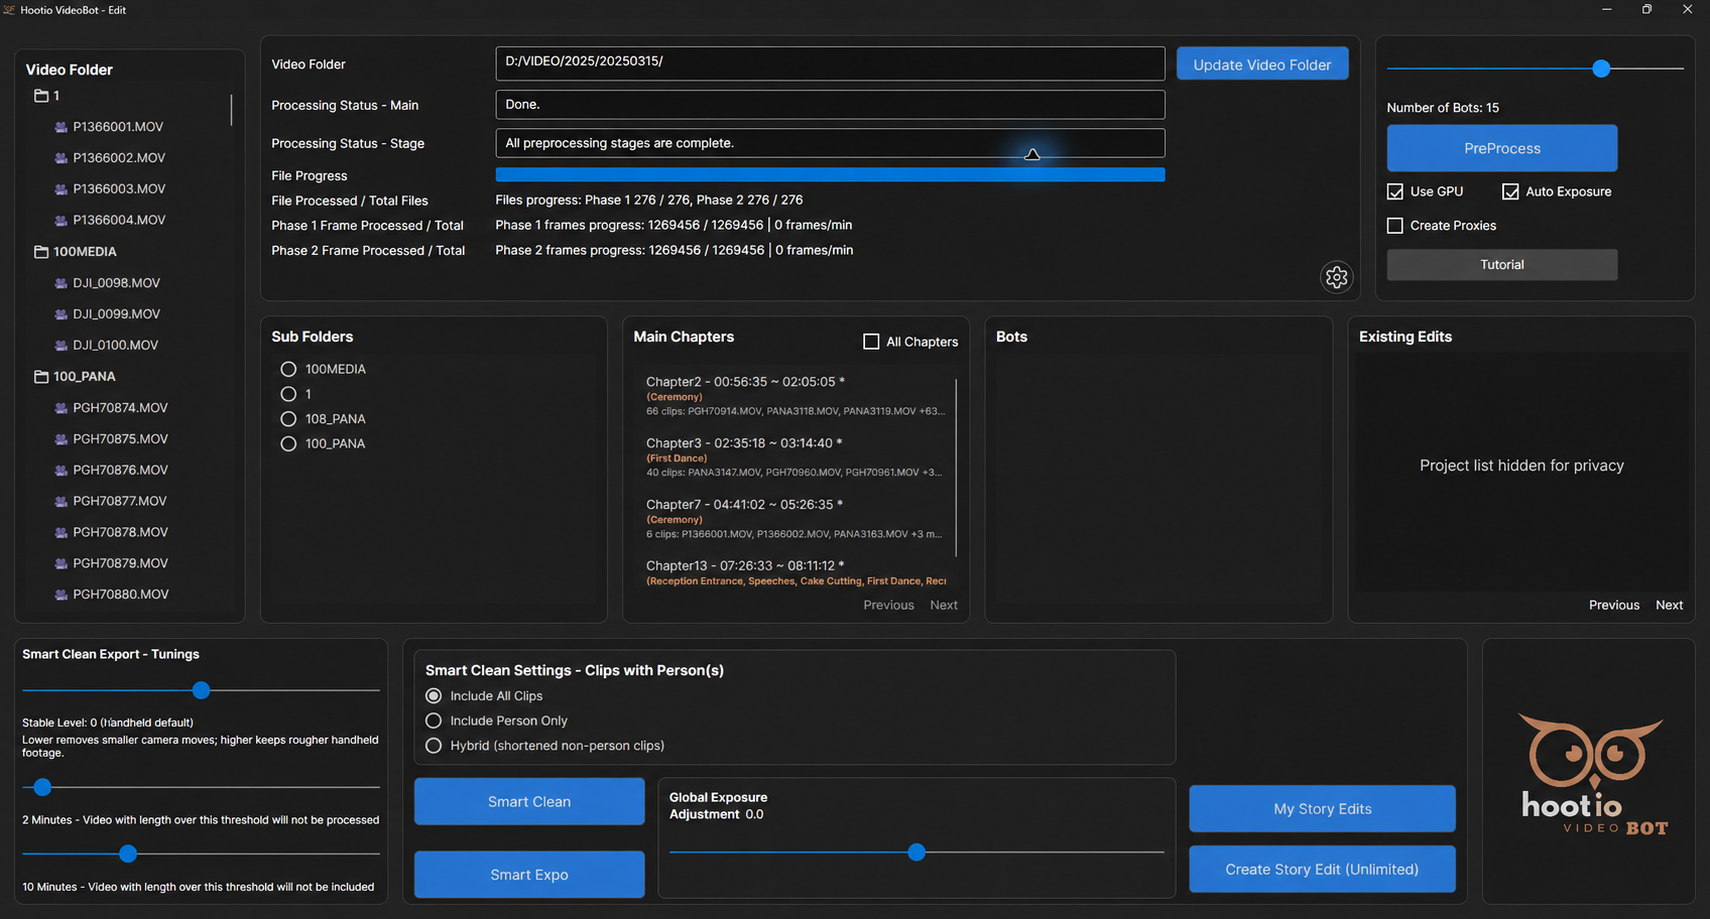
Why the demonstration counts differ. The new project scanned 279 files during import, while the existing project's completion record shows 276 files. Counts may differ because of the scan stage, which files can be processed, or the media present when each project was created. Do not combine the two projects' counts as though they came from one continuous run.
7 Navigating Chapters and Media
Find the section you want to edit
Video Folder on the left shows the scanned folders and media. Sub Folders in the middle lets you browse by media subfolder, and Main Chapters lists the main chapters. Entries may include a time range, an event name, and a clip count.
1. Once preprocessing has created chapters, review the time ranges and clip summaries in Main Chapters.
2. Select All Chapters to see the full list, then use Previous / Next to change pages.
3. To inspect a particular camera folder, select its entry under Sub Folders.
4. Double-click the target chapter to open its action window, then choose Export / Smart Edit / Smart Scene for your task.
Event labels such as Ceremony, Speeches, and First Dance help you navigate. Check automatic analysis against the picture and sound; do not judge the content solely by its label.
Choose the right chapter action
| Action | When to use it | Next step |
|---|---|---|
| Export | You only need the original synchronised multitrack chapter | Choose an output folder and continue editing in your editing application |
| Smart Edit | You want automatic multicamera selection and need to review the edit ranges | Open the timeline and check clips, cameras, and sound |
| Smart Scene | You want to work with speech passages such as vows or speeches | Prepare a transcript, then extract scenes by passage |
Chapter gap. Chapter Gap in Settings controls the time interval used to divide chapters. Its range is 2–60 minutes, with an initial value of 5. A smaller value can split the material into finer sections; a larger value can group more distant sections together. Click OK to reload chapters using the new gap. Cancel discards this gap adjustment. The value is not saved as a persistent output preference, so check it again when reopening. XML files you have already exported are not updated automatically.
8 Creating and Using Proxy Files
Proxies are lightweight versions of your media for smoother browsing and editing. Keep the original media. Before final output, check that your editing application is linked to the originals and that the final image quality is correct.
1. Open the Settings gear and find Proxy Settings.
2. Choose Proxy Resolution and Proxy Format. The newer workspace version also provides proxy folder layouts for the target editor.
3. Click OK to save, return to the project, and select Create Proxies.
4. Start PreProcess and wait for the proxy-related processing to finish.
5. Check the files in the appropriate output folder, then follow your editing application's proxy attachment workflow to use them.
| Setting | Options or rule | Usage notes |
|---|---|---|
| Proxy Resolution | 540p, 720p, 1080p, Half, Quarter, Eighth, Original | Fixed resolutions scale by height while preserving aspect ratio; fractional options scale both width and height |
| Proxy Format | Automatic, H.264, ProRes Proxy, DNxHR LB | Encoder availability depends on the platform and installed application package |
| Premiere layout | Source media folder / Proxies | Each source folder has its own proxy subfolder |
| Resolve layout | Media root / ProxyMedia / Original relative folder | Preserves the source files' relative folder structure |
What Automatic means. Automatic - H.264 / MPEG-4 in the graphical settings uses the H.264 / MPEG-4 encoding strategy. Hootio integration commands have a separate automatic profile that selects an encoder according to the platform and hardware. Do not confuse that profile with this dropdown option. The installed version used for this manual did not show Proxy Location; the newer workspace version provides it. DNxHR requires a minimum frame size of 256 × 120.
Changing settings does not delete existing proxies. A new preset does not automatically replace all existing proxies with the new format. After changing settings, inspect the files actually generated. The dimensions of an older proxy do not mean that the new settings failed to save.
9 Output Settings and Interface Language
Click the Settings gear on the home screen, or the gear in the editing window, to open settings. In a shorter settings window, scroll down to reach the LUT and Interface Language controls.
1. Choose the timeline dimensions under Output Sequence Resolution.
2. Choose PAL or NTSC under Video Standard, matching the timeline standard you intend to use.
3. Set Chapter Gap (minutes) to adjust the chapter grouping interval as needed.
4. Check the proxy format and resolution, and select the .cube LUTs you need.
5. Select English or Simplified Chinese under Interface Language, then click OK. The language change is previewed immediately. Cancel restores the previous language and discards ordinary setting changes from this visit. Clearing a LUT is an exception: it is saved immediately.
Available output dimensions are 1920 × 1080, 2560 × 1440, 3840 × 2160 (UHD), and 4096 × 2160 (DCI). PAL corresponds to 25 fps and NTSC to 29.97 fps. Existing projects retain their own timebase; changing the global preference does not guarantee automatic retiming of an existing project.
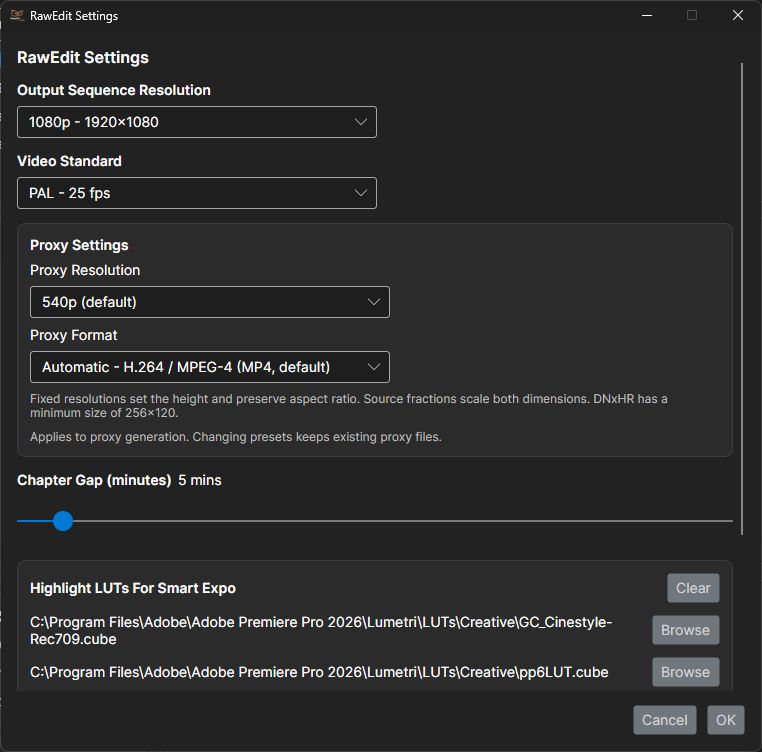
Configure LUTs
Highlight LUTs For Smart Expo provides two LUT slots for highlights. Full-Length Video LUT For Smart Expo is for the long-form video. Click Browse to select a local .cube file, or Clear to remove the corresponding configuration. A LUT's name does not guarantee that it matches your camera media. Choose a file suited to the media's colour space and check the actual result in your editing application.
How Clear is saved. Clearing a LUT displays a message that reprocessing will be required. Once confirmed, the cleared setting is saved immediately; clicking Cancel afterwards cannot restore it. Clear in the highlights section removes both highlight LUTs, while Clear in the full-length section removes only the full-length LUT. Run the relevant processing again after changing or clearing LUTs.
LUT paths refer to local files. If you move the project to another computer, check the LUT paths and the imported result in your editing application again. Exposure adjustments also do not replace a visual check for overexposure, highlight detail, and skin tones. If you enable Auto Exposure without setting all LUTs, a prompt appears. The application allows you to choose Proceed; missing LUTs do not always block processing.
10 Smart Clean
Smart Clean is designed for short footage organised into camera subfolders. It assembles a timeline from sections that meet the selected motion stability, duration and people-detection rules. It does not delete source footage from your drive or render an MP4 directly.
Procedure
1. Wait for project preprocessing and synchronisation to finish, then select the source subfolder to process under Sub Folders.
2. Adjust stability and the two duration thresholds under Smart Clean Export - Tunings.
3. Choose a people-detection policy under Smart Clean Settings - Clips with Person(s).
4. Adjust Global Exposure Adjustment if needed. A value of 0 adds no global offset; move left to darken or right to brighten.
5. Click Smart Clean, wait for processing, then choose an output folder.
6. Locate RawEdit_{timestamp}.xml and DavResFCPX-RawEdit_{timestamp}.xml in the output folder. Use the appropriate file for your editing application, then review the imported result manually.
| Parameter | Range and default | Meaning |
|---|---|---|
| Stable Level | -3 to +3; default 0 | Lower values are stricter and remove even small movements; higher values retain rougher handheld shots |
| Length Threshold | 1–30 minutes; default 2 | Videos longer than this are not subjected to this cleaning process; this does not necessarily exclude the entire file |
| Ignore Threshold | 2–30 minutes; default 10 | Videos longer than this are excluded from this output |
| Global Exposure Adjustment | -1.0 to +1.0, in 0.1 increments | A global exposure offset submitted with both Smart Clean and Smart Expo requests |
People-detection policies
Include All Clips includes every section that meets the other rules, making it suitable for retaining establishing shots, decorations and footage without people. Include Person Only includes only sections where people are detected, which may omit important shots without people. Hybrid (shortened non-person clips) retains sections without people but shortens them.
This filter checks whether people are present in the image; it does not select a particular person. No interface for naming people, manually merging person identities or managing the couple's identities has been verified in the current version.
If Please select a Sub Folder to export Smart Clean Timeline. appears, go back and select a subfolder. To retain more shots without people, check the people-detection policy first, then the stability and duration thresholds. Change one type of setting at a time to make results easier to compare.
11 Smart Expo
Smart Expo incorporates exposure analysis, the global offset and applicable LUT settings into the export workflow. Results may vary with camera footage, LUTs and how the editing application interprets the effects, so review the export.
1. Configure the required .cube LUTs in Settings and enable Auto Exposure before preprocessing if needed.
2. Wait for project preprocessing to finish. If you change a LUT later, follow the prompt to reprocess the affected footage first.
3. Set Global Exposure Adjustment to a suitable value. For the first export, leave it at 0 and compare the result before adjusting it.
4. Click Smart Expo, wait for processing, then choose an output directory.
5. Open the AutoExpo folder inside that directory. Depending on the returned bins, the export may contain several files named RawEdit_Bin{identifier}-{timestamp}.xml.
6. Import them into your Premiere workflow, check the bins, exposure and LUTs, then continue refining the edit.
The output differs from Smart Clean. Only the bin XML files described above are confirmed for the current Smart Expo workflow. The additional Resolve conversion is not enabled, so do not expect it to generate the same pair of files as Smart Clean.
Choosing an adjustment. If the footage is uniformly too dark, consider a small increase in global exposure. If cameras use different colour spaces, first check that each LUT is appropriate. A large global exposure offset will not compensate for an incorrect LUT.
12 Smart Edit Multicamera Editing
Double-click a chapter, then choose Smart Edit. The button is available when the chapter contains video and preprocessing for its video clips is complete; other chapters in the project may still be processing. Wait while Analyzing chapter... is displayed.
Follow the illustrated demonstration
The illustrated Smart Edit walkthrough follows a real multicamera editing session, from opening a completed project and comparing synchronized views to setting camera preferences, reviewing track weights and generating an editable timeline.
The example uses the main outdoor Ceremony in Chapter7 of the completed 20250315 project. At the sampled position, two cameras show opposite views of the couple while the third points at the ground. Comparing all available angles makes it easier to check camera priorities before generating the edit.
Open the standalone demonstration PDF for the detailed actions, original screenshots, visible checkpoints and separately reported output verification.
The demonstration records five generated files and explains a declaration-only UTF-8 correction for its Premiere XML. Destination-editor import and playback remain separate checks.
Understanding tracks and previews
The top Track-1 / Main track is the preferred camera angle. The second track contains important supporting angles, while the remaining tracks provide less frequently used backup angles. After automatic track arrangement, the camera assigned to a particular track number may change with the event.
Click the time ruler to view a thumbnail from each track at that position. This interface supports multicamera inspection at selected times; full real-time playback with sound has not been verified.
1. Check that your main camera angle is on the top track. Click Reverse Tracks if you need to reverse the order of all tracks.
2. To move a whole track, hold Shift and drag up or down from an empty area of that track.
3. Click key positions on the ruler to check the primary angle for events such as the ceremony, speeches and entrances.
4. Select the clips you want to adjust, then follow the next chapter to split clips, exclude sections, assign events and set switching modes.
Generating a multicamera edit
1. Review track priorities, shots you want to hold, excluded clips and event assignments.
2. Click Process Video.
3. In the Before processing prompt, check that the main footage is on the top track and that switching modes are correct for important shots, then click Proceed.
4. Wait for processing and choose an output directory.
5. Save PrePro-{chapter-name}-{timestamp}.xml, DavResFCPX-{chapter-name}-{timestamp}.xml and the accompanying files, then review them in your editing application.
No Save Draft or Undo button has been verified in the chapter editor. Do not assume that each drag operation or weight adjustment is permanently saved. Generate and save the results you need before closing the window.
13 Selecting Clips and Controlling Camera Switching
The menus in this chapter are based on the source code in the current workspace. If your installed version or an older tutorial shows categories such as Handheld / Tripod, check the version before treating those names as equivalents of the current menu options.
Selecting and splitting clips
Click a clip to add it to or remove it from the selection. You can click several clips in succession to select them. Drag a rectangle from an empty area without holding Shift to select clips within it. Click the time ruler to position the cursor, then press C to split every video track with a clip spanning that point; this is not limited to a single selected clip.
Dragging a clip up or down onto another track swaps the track contents over the same time range, splitting boundaries where necessary. When dragging multiple selected clips, the operation uses the range of selected clips on the source track. This changes camera priority; it is not a conventional editing tool for moving footage freely earlier or later. Dragging horizontally on the same track does not freely change the clip's timing.
Setting a camera switching mode
1. Select the clips to adjust, then right-click and open Camera Switching.
2. Choose Standard Switching for normal automatic switching, or Hold This Camera to mark an angle you want to retain.
3. Choose This clip to affect only the current clip, or All selected clips to apply the mode to the selected set.
4. Check the selection and affected range before making further adjustments.
Hold This Camera does not guarantee that the edit will never cut away. Quality problems or emergency switching may still cause another angle to be used.
Excluding clips and assigning events
Right-click and choose Exclude to leave a clip out of the generated edit. Right-click again and choose Include to restore it. This does not delete the original media.
Select clips covering the target time range, click Event Type, choose an event, then click Apply. The button may be unavailable when no clips are selected. Click Legend to see what the colours mean. Events include Getting Ready, First Look, Portrait Session, Ceremony Entrance / Ceremony / Ceremony Exit, Cocktail Hour, Reception Entrance, Speeches, First Dance, Parent Dances, Cake Cutting, Bouquet or Garter Toss, Reception Dancing and others. Use Unknown or Other when the event cannot be classified clearly.
14 Track and Clip Weights
Weights control the typical shot duration and number of appearances used by automatic editing. They do not control volume or opacity, and they do not guarantee an exact duration for every shot.
Setting weights for an entire track
1. In Smart Edit, click Track Setting.
2. Find the relevant track and set Minimum seconds, Maximum seconds and Rounds before next.
3. Make sure the maximum duration is at least as long as the minimum.
4. Click Save to apply the settings. Use Reset Defaults to start again from the defaults, or Cancel to discard changes made in this dialog.
| Parameter | Limits | Meaning |
|---|---|---|
| Minimum seconds | At least 0.8 seconds, in 0.5-second increments | The lower limit for normal shot duration |
| Maximum seconds | At least 0.8 seconds and no lower than the minimum value | The upper limit for normal shot duration |
| Rounds before next | 1–8; fixed at 1 for Track-1 | The number of appearances before moving to the next lower priority |
The source-code defaults are approximately 16–32 seconds and 1 round for Track-1; 8–14 seconds and 2 rounds for Track-2; and 5.3–8 seconds and 1 round for Track-3 and below. Use the values shown in your installed version as the actual defaults. Durations are ultimately converted to frames using the project frame rate. The upper limit for the minimum value is 10000 ÷ fps seconds; the upper limit for the maximum value is 20000 ÷ fps seconds.
Overriding the weight of one clip
Right-click the clip → Clip Weight → Set / Edit Override..., select Override Track Weight, set the three parameters, then click Save. That clip will use the override values. To restore inheritance, right-click and choose Use Track Weight. You can also clear Override Track Weight and save.
Check which track the clip belongs to before adjusting it. A clip-specific override does not become the default for other clips. Do not assume that it is saved as a chapter draft that will be restored the next time you open the chapter.
15 Smart Scene: Selecting Audio and Generating Transcripts
Smart Scene lets you select scenes by their spoken content, such as vows, speeches or an emcee's announcements. Open Smart Scene from the chapter window after chapter synchronisation is complete.
Main chapters with a usable prepared transcript open directly in the text-selection interface. Other chapters first open Hootio Smart Scene - Audio Transcript. If a prepared transcript is missing or damaged and an error appears, do not assume that the application will automatically return to the transcription workflow.
1. In the audio-selection interface, click clips containing the important speech. Clicking toggles their selection state.
2. Set Transcript Language. Use Auto when unsure; selecting a known language directly can reduce recognition ambiguity.
3. Select at least one clip, then click Generate Transcript.
4. Wait for transcription. You cannot change the language during processing. Use Cancel in this interface if you need to stop.
5. Once at least one transcript is available and processing is no longer running, click Launch Smart Scene.
Language options include Auto, English, Simplified Chinese, Hindi, Arabic, Japanese, Korean, French, German, Spanish, Portuguese, Russian and Italian.
Transcription reads the original local audio, prepares a 16 kHz mono WAV when necessary and uses the recognition model supplied with the application. The source drive and audio files must remain accessible. Retrieving the audio list and extracting scenes later still require the project service and a signed-in session; this is not a fully offline workflow.
16 Smart Scene: Selecting Passages and Exporting
The text interface has three selection levels: the full transcript, paragraph groups and individual segments. Narrow the content in the left-hand columns, then select the speech you want to retain in the third column.
1. Select the target transcript, then the relevant paragraph group.
2. Click segments in the third column to toggle their selection. You can select multiple non-consecutive segments.
3. To select a continuous range, click the first segment, then Shift-click the last.
4. Select at least one segment, then click Extract Scene.
5. Enter a meaningful Smart Scene Name, such as ceremony-vows, then click OK. An empty name or cancellation does not generate a result.
6. Wait for extraction to finish, then choose a location in Save XML and save the file.
7. Import the generated sp_{name}_{timestamp}.xml into a suitable editing workflow. Check sentence boundaries, audio continuity and camera changes.
Long text in the left-hand columns may display only its first 600 characters. This does not necessarily mean that the full transcript is missing. Inspect the paragraph groups and individual segments before making your selection.
This workflow saves one XML file returned by the server. No automatic local conversion into an additional Resolve version or colour-script package has been confirmed. Keep source media paths intact and refine the edit after import. Selecting text does not complete the audio mix or render a finished film.
17 Story Edit
Story Edit creates a highlight editing plan from the project's story information and full-day transcript. It serves a different purpose from Smart Edit for individual chapters and Smart Scene for selecting passages of speech.
Creating a Story Edit task
1. Wait for project preprocessing and chapter analysis to finish, then check that Create Story Edit is available.
2. Click the button to open AI Story Editor.
3. Set Target highlight length (3–8 minutes) to an integer from 3 to 8 minutes. The default is 5 minutes.
4. Click Create Story Edit to submit the request and wait for the analysis or creation status to update.
5. When it is complete, open My Story Edits to view the result. The target length is a planning goal, not a guarantee of the final film's exact duration.
The plan language follows the current interface language: Simplified Chinese or English. The project requires a valid signed-in session and online services. Do not submit the same creation request again while it is processing.
Remaining attempts and account limits
For standard accounts, the interface counts completed and in-progress tasks per project. The current logic allows up to two occupied Story Edit slots, and failed attempts do not count. Your account may also be subject to a monthly project limit supplied by the server. Refer to the button, its tooltip and the server response for the applicable limits.
The demonstration account displayed Create Story Edit (Unlimited). This is an account-specific exception and does not mean all users have unlimited access. This manual does not verify or promise any subscription pricing.
18 Viewing and Downloading Story Edit Results
1. In the project window, click My Story Edits.
2. Locate the required task. The list shows up to 5 entries per page; use Previous / Next to move between pages.
3. Check the status: Processing means work is still in progress; Failed means the task failed and you should check the message; only Ready entries have completed results available to download.
4. Click a Ready entry and choose a separate output directory.
5. Save the Premiere timeline, Resolve timeline and PDF editorial plan. If an older server does not provide a PDF, an explanation document may be downloaded instead.
6. Read the opening quotation and section order in the download-complete message. Check the timeline against the plan before continuing to refine the edit.
File timestamps reflect the server's generation time converted to your computer's local time zone. When downloading the same task again, check for files with the same names and older results in the output directory to avoid mixing versions during editing.
Legacy Reel. The list remains compatible with older records and can download InstantReel-{timestamp}.xml and InstantReel-DavinciResolve-{timestamp}.xml. There is currently no connected interface for creating a new Instant Reel. Use the current Create Story Edit workflow.
19 Exported Files and Save Locations
Keep separate export folders for each project and purpose, for example 20250315-exports/SmartClean, 20250315-exports/Chapter2, and 20250315-exports/Story. These are suggested filing conventions, not a complete list of folders the application creates automatically.
| Export command | Main files | Save location |
|---|---|---|
| Smart Clean | RawEdit_{timestamp}.xml and DavResFCPX-RawEdit_{timestamp}.xml | The selected folder |
| Smart Expo | RawEdit_Bin{identifier}-{timestamp}.xml | The AutoExpo subfolder inside the selected folder |
| Chapter Export | PrePro-ChapterEdit_{timestamp}.xml and DavResFCPX-ChapterEdit_{timestamp}.xml | The selected folder, with additional Resolve support files |
| Smart Edit → Process Video | PrePro-{chapter name}-{timestamp}.xml and DavResFCPX-{chapter name}-{timestamp}.xml | The selected folder, with additional Resolve support files |
| Smart Scene → Extract Scene | sp_{name}_{timestamp}.xml | The file specified in Save XML |
| My Story Edits → Ready | Premiere and Resolve timelines, plus a PDF editorial plan or fallback explanation | The selected folder |
The Resolve support files for Chapter Export and Smart Edit include a matching .colors.json file, Hootio Apply Clip Colors.lua, and -DaVinci-Instructions.txt. Keep the XML and JSON from each export together. Do not assume that Smart Clean, Smart Expo, or Smart Scene also generates these files.
XML does not contain the original media. It references source media and supporting files. When transferring XML to another computer, you will usually also need to provide the media and any required supporting audio or video, then relink the paths. A successful export confirms that the files were generated; it does not confirm that every effect has been validated in the destination editing application.
20 Continue Working in Your Editing Application
Premiere Pro
1. Create or open the destination editing project and keep the media drive connected.
2. Import the corresponding Premiere XML using the application's import command, or drag the XML into the Project panel.
3. Open the imported sequence. If media is offline, relink it to the actual source file locations.
4. Check the sequence resolution and frame rate; synchronization at the beginning, middle, and end; audio edit points; alternate camera angles; exposure; and LUTs.
5. Refine any unsuitable edits, finish the color and audio work, set the output options, and render the final film.
This edition provides static instructional images; the application's original historical animations are not included. Menus and results may differ in your installed version.
DaVinci Resolve
1. Use File → Import → Timeline to import the corresponding DavResFCPX-...xml, using the frame rate of the export.
2. Open the timeline. For Chapter Export or Smart Edit exports, initially preserve the original name, clip ranges, and track order.
3. To restore the exported clip colors, run the accompanying script as described in the next chapter.
4. Check source media links, audio/video synchronization, sound, color, and edit points, then save the Resolve project.
5. Continue with manual refinements and the final render.
This manual verifies the application's export paths and supplied import instructions. It does not represent import and effect compatibility testing across every version of Premiere or Resolve. Compatibility with specific Final Cut Pro versions was also not tested during this session.
21 Restore Clip Colors in Resolve
These instructions apply to chapter exports that include a .colors.json file and a Lua script. The script uses the export records to restore timeline clip colors and review markers, and attempts to relink offline media using its original paths.
Install the script once
1. Locate Hootio Apply Clip Colors.lua from the same export.
2. Copy it into the Utility folder in Resolve's user scripts directory. Create the folder if it does not exist.
3. Restart Resolve. Only the Lua script needs to be installed; leave the XML and JSON in the export folder.
Windows user scripts directory: %APPDATA%\Blackmagic Design\DaVinci Resolve\Support\Fusion\Scripts\Utility.
macOS user scripts directory: ~/Library/Application Support/Blackmagic Design/DaVinci Resolve/Fusion/Scripts/Utility.
Apply colors after each import
1. Import the matching XML and open the original timeline. Complete the following steps before manually moving, trimming, or renaming clips, or reordering tracks.
2. Select Workspace → Scripts → Hootio Apply Clip Colors. Some versions place it in the Utility submenu.
3. Select the matching .colors.json from this export.
4. Check the results in Workspace → Console, then save the Resolve project. You do not need to run the script again when reopening that saved project.
Normal clips are colored by camera angle. Ranges that fail the quality checks use Violet and red duration markers. Violet on an underlying camera track means only that camera's corresponding range failed the checks; Violet on the edit layer means all available camera angles failed at that point. One purple clip on an underlying track does not mean every camera's footage is unusable throughout that range.
If matching fails, reimport the XML and use its paired JSON. If the source media has moved, first use Resolve's relink function. If an older Windows Lua environment cannot read a path containing Chinese characters, copy only the JSON to a simple path using English characters and select it again. Do not run the Lua file by double-clicking it in File Explorer.
Script API availability depends on the Resolve version and edition; the free edition requires verification in your environment. This local script does not reanalyze or render media, and it does not upload your footage. It does modify timeline colors and markers.
22 Keyboard Shortcuts and Efficient Editing
The following Smart Edit chapter editor operations have been verified in the current source code. Use the shortcuts when the chapter editing window has focus; do not test them while typing in a text field.
| Action | Result | Requirement |
|---|---|---|
| Click the time ruler | Place the position line and update the multicamera preview | Smart Edit chapter window |
| 1–9 or numeric keypad keys | Select navigation track 1–9 | The corresponding track must exist |
| Left / Right arrow | Move by one thumbnail sampling interval | Click the ruler first; this is not frame-by-frame navigation |
| Shift + Left / Right | Move by five sampling intervals | Same as above |
| Up / Down arrow | Jump to the previous / next clip boundary on the selected track | Select a navigation track and place the position line first |
| C | Split every video track that contains a clip at the current position | Set the intended cut point first |
| Shift + drag an empty track area | Reposition the entire track | Start in an empty area, not on a clip |
| Click a clip | Add it to or remove it from the selection | Click additional clips to build a multiple selection |
| Drag a selection rectangle in an empty area | Select multiple clips | Do not hold Shift |
Hold an arrow key to move continuously; the preview updates when you release it. Space for playback, Ctrl+S for saving, Ctrl+Z for undo, and Delete for deletion have not been verified as bindings, so they are not listed as application shortcuts.
Tutorials. The main processing window's Tutorial contains Pre Process, Smart Clean, and Smart Expo tabs. Use Prev / Next to change pages and OK to close. The chapter editor also has a Tutorial button. Selecting Do not show again disables automatic display; you can still reopen the tutorial manually with its button.
23 Troubleshooting and Recovery
PreProcess is disabled or the media count is zero
Make sure you used Choose Video Folder to select an existing root folder, that the source drive is connected, and that you have read and write permission. Check the media list on the left after selecting the folder. Running tasks also disable some buttons, so first check the Main / Stage status.
Progress appears to be stuck
Distinguish between scanning, synchronization, and frame analysis. Long recordings, long videos, or a particular synchronization stage may take longer. Check whether the current file, ETA, frame count, or Bots status is changing. Do not diagnose a hang from one progress bar alone. If a specific error appears, address it as instructed and retry.
You need to stop or restart processing
No separate Pause / Stop button has been verified in the current main window. Closing the processing window cancels background processing and the associated FFmpeg tasks. Reopen the same project and click PreProcess to continue using saved progress. Calculations that had not yet been saved at the moment of closing are not guaranteed to be retained.
Disk, network, or GPU errors
If disk space is insufficient, check free space on the drives containing your media, proxies, exports, and system cache. If the source drive disconnects, reconnect it and restore the original path. Restore connectivity after a network or service failure, and sign in again if your session has expired. If GPU processing cannot be enabled, use the CPU; restart the application before trying GPU detection again.
Smart Clean asks you to select a subfolder
First select a target folder under Sub Folders. If the button remains unavailable, wait for project preprocessing and synchronization to finish. If the result omits shots you wanted, check the person selection mode, Ignore Threshold, and Stable Level.
Smart Edit or Smart Scene is unavailable
Smart Edit requires all videos in the selected chapter to be processed; Smart Scene requires synchronization to be complete. Check that you selected the correct chapter and that it contains video. If an existing main-chapter transcript is damaged, address the reported error rather than repeatedly submitting extraction requests.
Story Edit is disabled or you have no attempts remaining
Wait for all preprocessing and chapter analysis to finish. Check for tasks already in progress, the remaining allowance for this project, and any monthly limit. Unlimited is an exception available to certain accounts. No subscription purchase menu has been verified in the desktop application; follow the account prompts to contact support.
Media or colors are missing after import into an editing application
Make sure the media drive is connected and the original files and required supporting files, such as hoothoot.audiodrift, still exist. XML does not package the media. Restoring Resolve colors requires the script and JSON from the corresponding chapter export, applied before manual editing. Other workflows, including Smart Expo, may not provide these files.
24 Installation and Hootio Integration
Installation packages and supporting files
The current project targets 64-bit Windows, Intel Macs, and Apple Silicon Macs. On Windows, use the complete installer or fully extract the portable package; do not copy only the EXE. On macOS, use the package for your processor architecture. The application is normally installed in Applications. Keep the supplied models, FFmpeg, and other supporting files with the application.
The repository's installation notes currently specify macOS 15.5 for the Intel Mac dependencies and macOS 14 for Apple Silicon. Follow the instructions included with the actual package you receive. The public download page, minimum Windows version, and minimum hardware requirements were not verified during this session, so they are not stated here as confirmed requirements.
Hand off from Hootio Smart Import
After importing media, Hootio can hand it over to VideoBot to generate proxies, or create / reuse a Smart Edit project and start preprocessing automatically. VideoBot still requires its own valid sign-in and device session.
This integration usually looks up and reuses an existing project by media root folder. It therefore differs from the manual Create New Edit demonstration on the home screen. Acceptance of an external launch command does not mean proxy generation or preprocessing has finished; check the actual task status in VideoBot.
If Hootio cannot find VideoBot, first confirm that the application is fully installed and can be launched from the desktop. If the application opens but the task does not start, check the sign-in status, media path, and error messages. Advanced command-line interfaces are outside this manual's everyday workflows.
25 This Demonstration and Further Verification
Recorded steps in the installed application
• Opened the installed Hootio VideoBot, which automatically restored the existing signed-in session.
• Viewed the previously completed project for the specified media path in a maximized window, recording Done, completion of both phases, and the chapter list.
• Returned to the home screen and clicked Create New Edit to open a blank demonstration window, then selected D:\VIDEO\2025\20250315 again.
• Recorded the Before you continue prompt and proceeded with import. This scan identified 279 files.
• Clicked PreProcess and confirmed the start, recording the new project's preparation and audio synchronization stages.
• Opened Settings to record the output, proxy, LUT, and language options, without saving any settings changes.
Use the accompanying materials
The PDF is suitable for continuous reading and printing. en.html is the complete English offline manual, with chapter search and enlarged image viewing. For offline use, keep the assets folder alongside the page.
This edition provides static instructional images; the application's original historical animations are not included. Follow the written instructions for current operations. The “preprocessing complete” image comes from the older project and is labelled separately from the newly created project.
Items still requiring verification in your environment
Complete testing has not yet covered the new project's end-to-end processing results, actual NLE import for every export type, operation on a physical Mac, or behavior across different account plans. The newer source version also differs from the installed version in its resource levels and menus. Use this manual to guide the workflow, then check the installed version you are using and any reported errors. Do not assume that interfaces are identical across installed versions.